Blog #38 Meg Swansen & Cully on Yoke Construction
Seamless Yoke construction, plus tips for the Ebb & Flow Yoke design in particular
Dear Knitter,
When knitting a seamless yoke sweater using Elizabeth Zimmermann’s EPS formula, there are myriad techniques involved. Here are three that you generally come across:
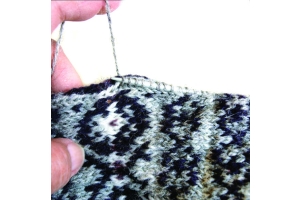
1) If working color-patterns on the body or yoke of a pullover, when the end of the round meets the beginning you will confront an inevitable jog. My blog #14 - both text and video - deals specifically with this topic.
2) Whether to knit the sweater up from the lower edge, or down from the neck, is an option for knitters; there are advantages for both methods. My preference is to work up from the lower edge, which means I decrease the yoke section from a maximum number of sts (body and sleeves united; minus 4 underarm sections) to wanted yoke-depth and neck-circumference.
Depending upon the yoke motif, the decreases may be vertical - between the motifs - or in horizontal rings. If the latter, you may count upon using some of the following percentages for horizontal decreases.
For a
20% decrease (or 1/5), turn 5 sts into 4 as follows: (k3, k2tog) around
25% decrease (or 1/4), turn 4 sts into 3 as follows: (k2, k2tog) around
33% decrease (or 1/3), turn 3 sts into 2 as follows: (k1, k2tog) around
40% decrease (or 2/5), turn 5 sts into 3 as follows: (k1, k2tog, k2tog) around
3) Underarm Stitches: instead of sewing together cast-off-stitches, you can make the entire garment seamless: put those stitches on threads, and invisibly weave them together for greater comfort and flexibility. There is a video demonstrating this in my Blog #33.
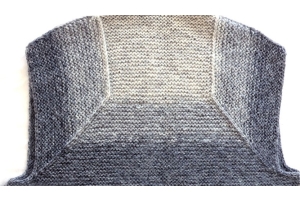
4) This section is specifically applicable to Cully Swansen’s unique yoke design in Wool Gathering #108. Here are Cully’s tips relating to possible variations to his Ebb & Flow design:
[Please note that there is a slight correction to the instructions for the Ebb & Flow Yoke. It has been corrected on the digital version, but on page 6 of Wool Gathering #108, the beginning of the 2nd column should read:
“begin working 8 sts less every other row for 10 (12, 16, 19) more ridges.”]
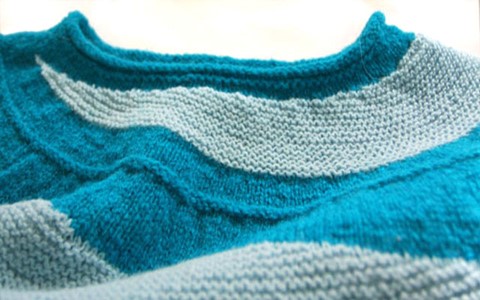
How to adjust the size and slope of the waves on the Ebb & Flow sweater:
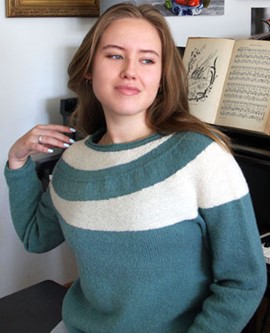
As shown above, the 2 waves, plus the 3” of material between them adds to about 7-8” of yoke depth. Any extra yoke depth will be worked plain before the first wave. So if you want a 9” deep yoke, work for about 1.5” plain before beginning the first wave.
In the WG, the first wave is 28 ridges high on the thick edge, the second wave is about 60% of that (16 ridges high on the thick edge). If you want shallower waves, how would you figure the number of sts to leave unworked at the end of each short row, so that you get an even slope to the wave?
You will leave a 12 stitch gap between the 2 ends of each wave (each wave does not meet itself on the shoulder), so for the first wave you are working with your entire yoke stitch-count, less 12 sts. For example, for the 42” size in the WG, that works out to be 328 sts.
If, instead of the 28 ridges in the WG, you want that wave to be only 20 ridges thick. During each ridge you will need to leave 16 sts unworked (328 ÷ 20 = 16.4, round down to 16), or 8 sts at the end of each row.
Making Waves:
In the WG, we made the slope steeper at the beginning of the wave, then flattened it out later, by first leaving 4 sts unworked for several ridges, then leaving 8 sts unworked for the remainder; this helped prevent the thin edge of the wave from being too thin for too long.
So, in the example we just calculated, you could leave 4 sts unworked at the end of each row for 7 ridges, then leave 8 sts unworked at the end of each row for the next 7 ridges, then leave 12 sts unworked at the end of each row for the last 6 ridges - this will help to taper things more quickly at the pointy end and less quickly at the thicker end. The math still works because the fewer sts (4) for 7 rows balances with the greater number of sts (12) done on the last 6 rows - the average will be 8 sts overall.
If you want the same proportion between the waves, then in this example your 2nd wave will be about 60% of the first, or 12 ridges. After the yoke decreases (worked between the waves, as described in the WG), you will be working with 204 sts, less the 12 sts for the gap between the ends of the 2nd wave, means you have 192 sts. Over 12 ridges, you will need to leave 16 sts unworked each ridge (192 ÷ 12 = 16), which is - again - 8 sts at the end of each row. In the same manner as the first wave, you could leave 4 sts unworked at the end of each row for the first 4 ridges, then 8 sts unworked on each row for the next 4 ridges, and 12 sts unworked on each row for the last 4 ridges.
Now, because your waves will be thinner, you will have to work more plain rounds before beginning the first wave, in order for your yoke to be the same depth. In this example, the median thickness (average the thick and thin ends) of each wave is 10 and 6 ridges, respectively, which - at 6 ridges per inch - is 1.66” and 1”. Add to that 2.66” the amount of plain knitting you want between the two waves, then subtract that total from the total wanted yoke depth of 9”, and that is how much plain knitting to work before beginning the first wave.
With this relatively simple math, you can change the depth of your wanted waves (even, perhaps, making 4 very thin waves), and still give them a relatively even, smooth slope.
Knit on with confidence!
Meg & Cully